
New Bed Rack Setup, Ski/Bike Racks, & Lights
- drewkillsit

- Oct 19, 2021
- 6 min read

I’m still happy I have the Rebel Offroad Xplor rack, but I have always wanted to change two things:
I wish it was about 3 inches taller (or some size between mid and full). There are adjustable racks out there right now and I think that’s the way to go.
I don’t like the fact that it’s full-length. Initially, I appreciated it (mostly from a visual standpoint). In practice, it makes it impossible to reach anything in the bed and my RTT was barely able to be attached.
Here’s the full list of what I did:
Shortened the rack
Added risers for the RTT
Moved all gear to the bed
Made a quick cargo install system
Made a quick shower tent install system
Swapped out some lighting
New ski rack option

Shortening The Rack
Although the front and rear pieces no longer align with the shape of the plastic trim, I really don’t care. Bringing these bars in just a few inches made a huge difference and I can now more easily reach into the bed, unzip the RTT, etc.

The side panels still attach, albeit in a different way (note: this is what I used as my guide to determine how far to bring the bars into the center). The only downside here is that the channel pieces on top now need to be installed upside down. On the plus side, I’m finding that channel to be a much easier means of running wiring (see riser pic below).

RTT Risers
I mentioned that the height of the rack bothered me. A big reason for this is that I always have a tough time zipping my soft RTT (which I would love to swap out one of these days). It was really close to the cab and with storage boxes on the side – and certainly with a shower tent – it made for an annoying process. Lastly, I ride mountain bikes and wanted to be able to throw a bike over the tailgate pad, but you can’t do that when a low-sitting RTT is in the way.

The risers are 3 inches and made it WAY easier to reach into the bed, attach storage boxes, and zip the tent up. As an added benefit, the riser blocks have a nut inside which keeps them in place. So, when I pull the RTT off for the winter, I can lower it back on and position it perfectly where I had it. No more measuring one side, adjusting the position an inch, back to the other side, etc.
Again, it would be great if the rack was just this height already. I wouldn’t say I love the look of the risers, but I’m going for function here.

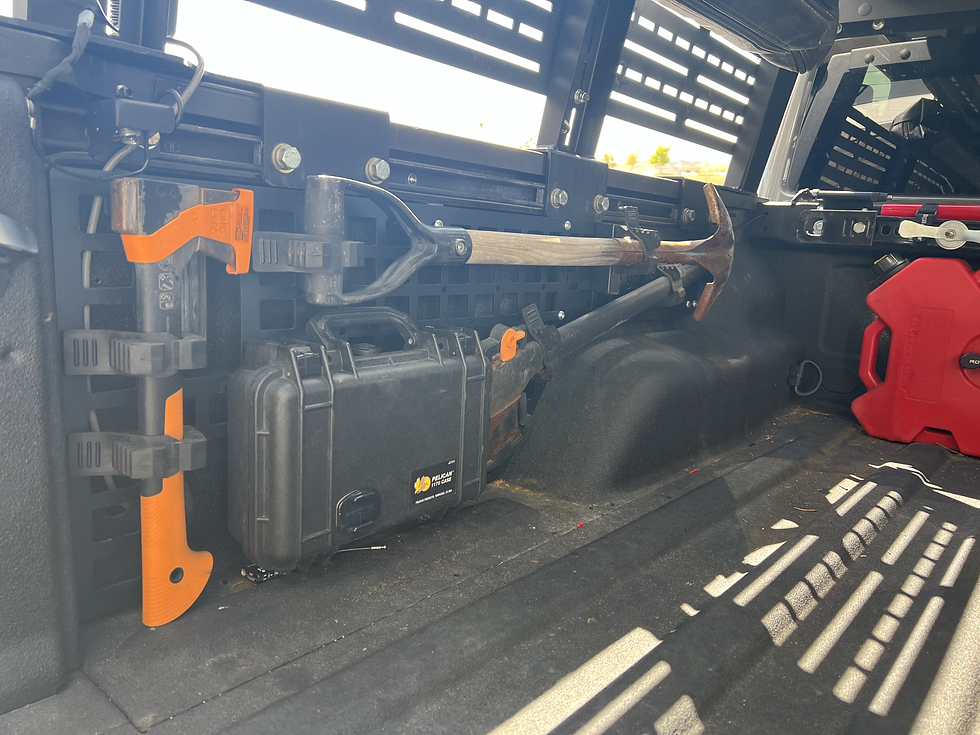
Gear In The Bed
Previously, all of my gear was on the rack: rotopax x2, shovel, axe, compressor, traction boards, etc. For a good part of the summer, I actually had the rack off of the bed. I was just kind of “over it" and was enjoying the new look. But, I didn’t want to be without the gear I needed when off-roading.
As a remedy, I purchased two JCR bed panels and attached most everything to those.
There were just a few differences:
I now have a propane tank mount built-in
The fuel rotopax is mounted to the bed itself under the hi-lift jack
I scrapped the Smittybilt compressor for a dual ARB, which is mounted under the hi-lift and connected to a 4-port system in each wheel well
Moved the traction boards to the roof, which release with the press of a button
Controversial, but I moved the water rotopax to the tailgate
Currently storing the spare on the rack using these straps and rack edge protection


If someone told me they thought the tailgate idea was stupid, I might have to agree. But, I intend to be able to have 3ish gallons of water right there where I typically need it, and the mount is intentionally easy to remove.

Cargo Install System
I’m not big on driving around all year with a ton of unused gear (says the guy with an axe in the back that hasn’t used it in almost a year). An example might be a propane tank; not going to keep that in there except for when I need it.
Lately, I’ve been putting the RTT on when I need it and keeping the spare on top of the rack when I’m not. It’s kind of nice and makes fitting a bike over the tailgate really easy. Plus, I’ve got mounts for additional bikes in place on top of the bed rack now, which (thanks to the risers) don’t need to be removed when I put the RTT back on.
I want everything to be easy to remove, and one of the things I’ve always wanted to remove with ease are the cargo boxes on the side. With the RTT cover hanging on the passenger side, it’s impossible to get things out of that box. The driver’s side is easy, but I want to be able to remove the box and take it elsewhere at camp, or store it back on the garage shelf.
The answer was to create a system where I can “hang” the box in place, then use latches to ensure it’s firmly against the bed rack panels. Two steel hooks allow me to place the cargo box in place. Then, I twist the 4 latches attached to the base of the boxes and latch them in place.


Doesn’t move an inch. Psyched about this update.

Shower System
I’ve had a few iterations of a shower tent setup. At one point, it was this super confusing system that when out and up but had to be held in place by straps when not in use. The fact that I can't even describe it well is an indication that it was too complicated. That system also made it really difficult to properly close and zip the tent.
The new idea was to mount the shower tent on rollers that would run on a track attached to the bed rack. When setting up camp, I would remove the tent from that track and slide it onto another track sitting just above the driver’s side rear door.

This system works even better than I had anticipated. Doesn’t move an inch and keeps the shower tent exactly where I want it. I intend to replicate this on the passenger side with my 4.5 x 6 awning.
Here are some of the parts:
Track nuts (modified)

Ski Rack Attachments
We are big skiers, so having a place for skis is really important. Obviously, there’s always the truck bed (duh), but we’ve been on trips with friends where we’ve got the back of the truck full of gear and it’s nice to have a more secure option for ski transportation.
I have a Yakima FatCat 6 which I typically use in the winter, but that would mean removing the spare tire and having to climb on the tire each time to pack or unpack skis. I liked the idea of installing 2-pair ski racks on either side, but A) that’s costly, and B) you really only get 1 pair per side, laying flat.


Instead, I used some garage hooks and square tubing to create a system for stacking pairs at an angle. Now I’ve got room for 4 pairs, excluding the bed. Each mount utilizes a retention strap to ensure they stay on the rack. Only thing missing is a buckle thing that will help retain the straps when not in use, and that's in the mail.

New Side & Rear Lighting
I mentioned in another post that I’ve recently swapped out my bumper lights, added a light beneath the bumper, and swapped my ditch lights. In this process, I also changed out the lights on my roof rack and the light on the rear end of my bed rack.
Previously, in both of these locations, I had these crappy Nilights that barely worked. Seriously some of the most pitiful lights I’ve ever seen. Meanwhile, the lights on the side of the bed rack are spectacular. I wanted something more substantial above the cab for times when I don’t have the bed rack on the back, and to cast light out at a greater distance than the lights on the bed rack (angled downward a bit).

The new lights above the cab are awesome. They are 22” and are the same brand as the front-facing light bar (which I’ve always really liked).

On the rear of the bed rack, I went with another 32” light bar from the same brand. Initially I had it mounted under (attached to, actually) the RTT, but wanted to keep it there year-round, so I attached it to the rack itself. As of right now, attaching the RTT means removing the light bar and reinstalling in a different place. Haven’t figured out a solution for that yet.


Comments